
Hi, everyone. In this post, we are going to discuss the 5 Nmap scans every penetration tester should add in their arsenal.
So what is Nmap and why is it widely used?
In simple terms, Nmap(Network Mapper) is a security scanner which is used to discover hosts and services on a computer network. It is widely used during penetration testing process because lots of information can be gathered by doing the correct Nmap scan on your target.
Information like
- Which operating system the target is using
- Which ports are open or closed
- Identifying different hosts on the network
- Which version of software the target is running
can be found out from a Nmap scan which is very useful in the information gathering process.
Installing Nmap
To use Nmap, you need to download and install it on your system. Nmap comes for all flavors of Operating Systems. It comes pre-installed with Kali Linux. We would like this post to be on the specific topic of Nmap commands so it will be better if you could search on how to install Nmap for your respective Operating System. There are many Youtube videos tutorials on that. In case of any problems, please comment and we will be glad to help.
Basic Syntax for Nmap:
nmap [ Scan Type ] [ Options ] { target specification }
e.g. nmap -A -T4 192.168.213.129
Don’t worry about what -A and -T4 for now. Just keep reading and you will understand everything by the time you complete this post.
Tools required to follow along with this post
1. Nmap correctly installed on the system.Check by using the command nmap in terminal.
2. Install VMware Player or VirtualBox.
3. Download metasploitable from here -> Extract the zip file -> Open VMware or VirtualBox whichever you have installed -> select the Open a Virtual Machine option -> Browse to where you have extracted Metasploitable -> Select Metasploitable.vmx -> Both Username and password are msfadmin.
Everything has been set up and you are good to go now. Let’s start some Nmap scanning.
Previously we used. nmap -A -T4 192.168.213.129
Let’s break it part by part.
You need to use the nmap command for doing Nmap scan. '-A' is the scan type. It is to enable OS and version detection, script scanning, and traceroute. '-T4' is the option for faster scanning. Its values can be from 0 (slowest) to 5 (fastest). The last part is the target’s name or IP address.
Note that '-A' and '-T4' are not the only scan type and option available, there are others available also. To check out the full list of different flags that can be used just use the command nmap in the terminal.
Now, let’s do something practical.
In the real world, you will either be given the target specification or the IP address for penetration testing. We can’t just do Nmap scan on any application available on the internet because it is illegal so we are using Metasploitable as our target because it is meant to be used for testing purposes.
Step 1: To find the IP address of Metasploitable. Since we have already downloaded and installed Metasploitable just use the command ifconfig in the Metasploitable terminal.
It will show two options eth0 and lo. The inet addr given in the eth0 section is the IP address of Metasploitable.
Now, we know the target’s address, so all we have to do is scan using different scan types and options to get the most useful information. This information can then be used to test if malicious activities could be performed on the open ports and how the version of different services running can lead to the hacking of the whole system.
We have installed nmap on my Ubuntu OS. The IP address for Metasaploitable in my case is 192.168.213.129.
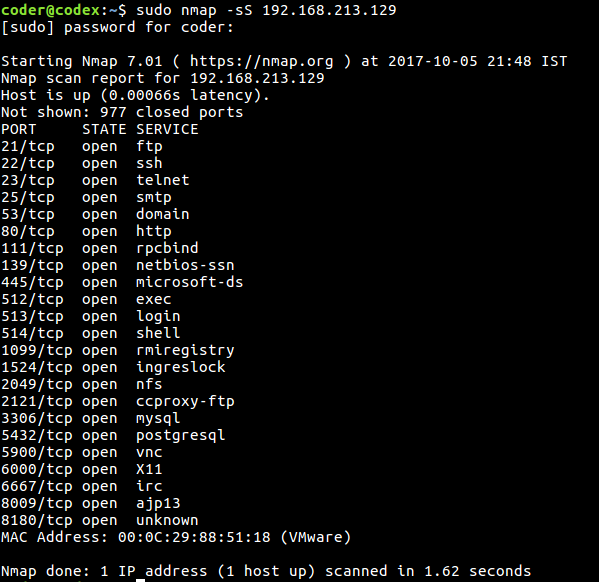
Command 1: Scanning for open ports.(Default stealth scan)
$ nmap -sS 192.168.213.129
This is the most used default scan for nmap. It is used for checking if the host is up. With the help of this scan, Nmap attempts a TCP SYN connection to 1000 of the most common ports.
Type the command as it is by changing the IP address with the IP address of your Metasploitable instance.
The command and the output will look like this:
Command 2: TCP Connect Scan.
$ nmap -sT 192.168.213.129
This command is similar to the first one i.e TCP SYN scan however rather than sending a SYN packet and reviewing the headers it will ask the OS to establish a TCP connection to the 1000 common ports.
The output will look like this. On first glance, both the results will look same. But if you look at the execution time they will be different because the first command performs a stealth scan while the second is a non-stealthy scan.

After reading this far, if you are still confused what TCP,SYN or packets mean, search for how TCP works and the 3 way handshake for TCP.
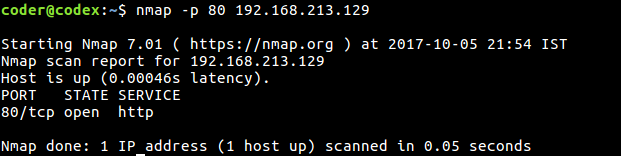
Command 3: To scan a specific port or a port ranges
To scan a specific port, use the command
$ nmap -p 80 192.168.213.129
Here, we are scanning the port 80 which is the HTTP port.
To scan ports between a certain range, use$ nmap -p 80-2000 192.168.213.129Nmap scanning for ports between 80 and 2000
Command 4: Aggressive scan
$ nmap -T4 -A 192.168.213.129
This is used for aggressively scanning of the target system.
The ‘-A‘ simply means to perform OS and version checking.
‘-T4‘ is the speed factor on how quickly to perform the scan. Its values can be from 0(slowest) to 5(fastest).
The output will look like this and most of the times the output can be quite large.

Command 5: TCP SYN and UDP scan for all ports.
$ nmap -sS -sU -Pn -p 1-65535 192.168.213.129
This command is used when we are scanning all the 65535 TCP and 65535 UDP ports. The flag ‘-Pn‘ means that we are assuming that the host is up. This is done because sometimes firewalls are setup which prevents ICMP replies.
Some Important Points:
- Many times, some Nmap features will not work if you are not a root user(Linux) or an user with Administrative privileges (Windows). So in case of any errors, try to use Nmap as the root user.
- Try different combinations for scan types and options. Nmap has many interesting things. We have only described the most common scans that are used by penetration testers.
Additional references:
Now if you think that you are ready to learn Nmap in depth, check out this page:
You can find the whole list of things for which Nmap is used. Also, we have left an important portion Nmap scripts. We will write about it in depth in another post. But feel free to learn what it is and why is it so popular.
Nmap + Nessus Cheat Sheet
If you also use Nessus with Nmap, download this cheat sheet instead as it has all the tables included in the Nmap cheat sheet plus three extra Nessus tables.
Have any questions about a problem in installation or any errors obtained during scanning? Feel free to comment and we will reply back as soon as possible.
Till then keep learning and Happy hacking..:)


